Buyers spend most of their attention on how a patch looks, embroidered or woven, merrowed or laser-cut border, thread colors matched to a brand. That is only half the decision. The backing, the layer on the reverse that decides how the patch attaches and how long it survives, determines whether the finished piece is still on the garment after a season of wear or peeling off in the dryer. The face is a design choice; the backing is an engineering one, and getting it wrong is the most common and most avoidable patch-ordering mistake.
Iron-on: convenient, and fussier than it looks
An iron-on patch carries a film of heat-activated adhesive on the back. Apply heat and pressure and the film melts into the fabric; let it cool and it grips. The adhesive activates in the region of 320°F (160°C), with cotton, denim, and canvas taking the top of that range and polyester and blends needing a gentler 270°F (130°C) to avoid scorching or shine. A typical application is fifteen to thirty seconds of firm, even pressure, followed by a full cure before the garment is stressed; most makers advise waiting about 24 hours before the first wash. The chart below shows why the fabric, not the patch, sets the temperature.
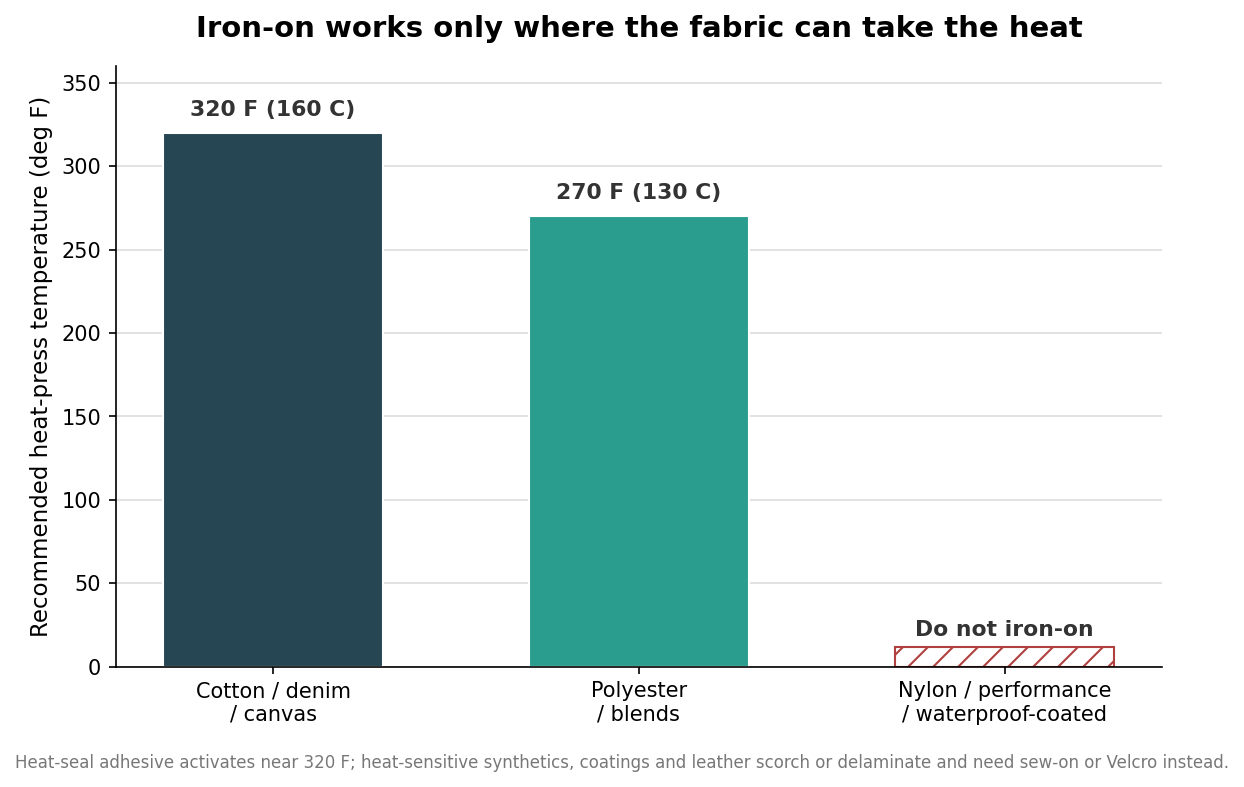
Where iron-on quietly fails is the fabric it cannot heat. Heat-sensitive synthetics, many nylons, technical performance fabrics, waterproof-coated shells, and leather will scorch, pucker, or delaminate long before the adhesive is happy. Those materials are not iron-on candidates at all, and pressing them anyway is how a promotional order comes back ruined. Iron-on is also a consumer-durability solution rather than an industrial one: expect roughly twenty to thirty wash cycles from a well-applied patch, longer with cold, gentle, inside-out washing, and it can usually be re-pressed three to five times before the adhesive tires. For retail merch, hats, tote bags, and DIY application it is ideal. For anything laundered hard or worn on the wrong fabric, it is the wrong pick.
Sew-on: the permanent answer
Stitching a patch through its border is the oldest attachment method and still the most durable by a wide margin. A sew-on patch works on essentially any fabric a needle can pierce, and its hold is effectively permanent.
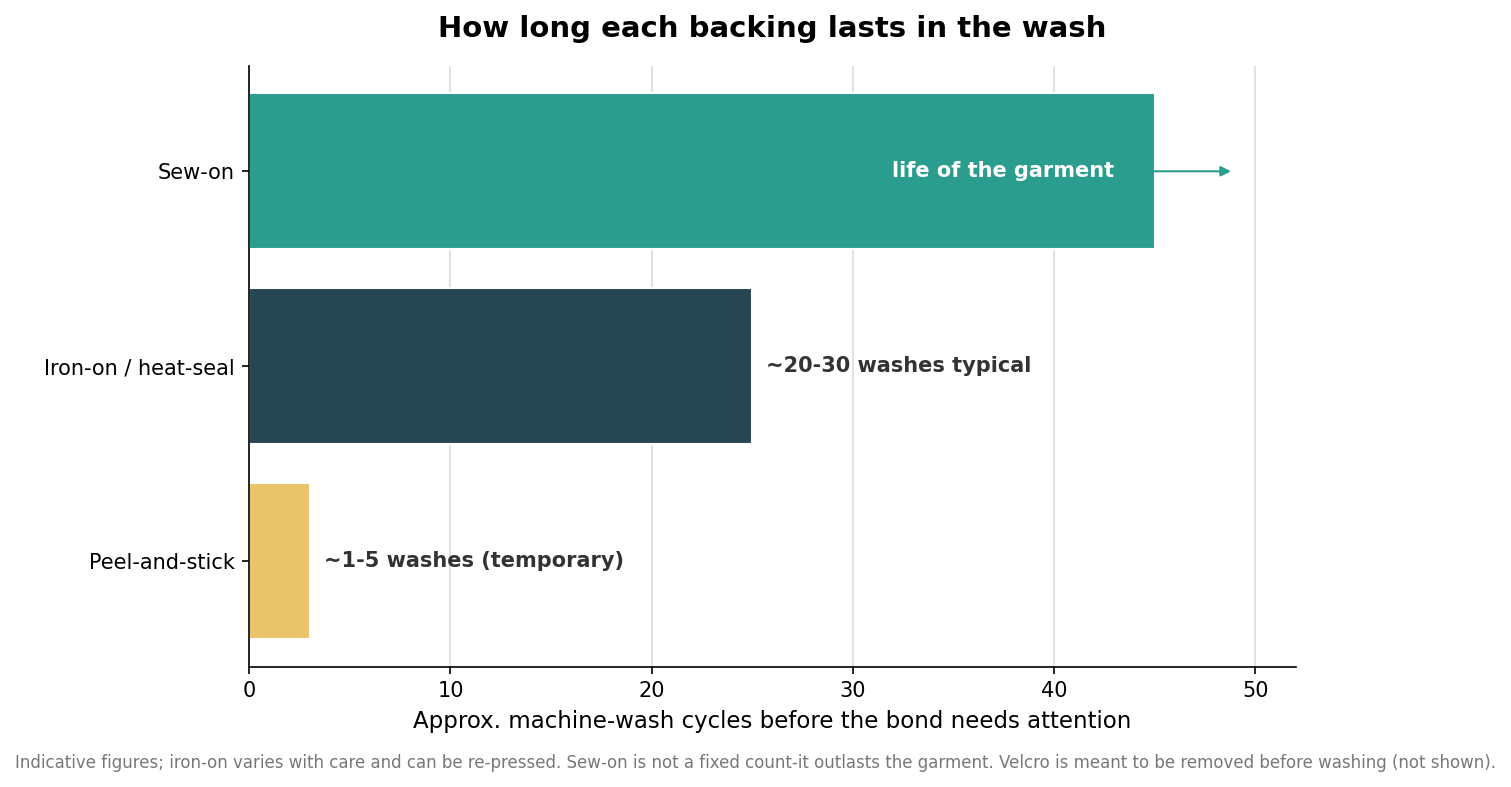
The durability gap is not subtle. Where iron-on is measured in dozens of wash cycles, a sewn patch generally outlasts the garment it is attached to, which is why military uniforms, varsity jackets, workwear, and biker vests are sewn rather than pressed. The cost is labor and time: hand or machine stitching runs several minutes per patch and usually means a tailor or an in-house sewing step, so it trades convenience for a bond you never have to think about again. When a patch absolutely must stay put through heavy laundering, sew-on is not one option among several; it is the option.
Velcro: for patches that need to come off
Hook-and-loop backing exists for a different requirement entirely: swappability. A Velcro-backed patch attaches to a pre-sewn loop panel in under a second and can be removed and reattached a thousand times or more, which is why tactical gear, name tapes, and morale patches use it. The trade-offs are that the garment needs the loop side installed first, the patch carries a modest premium of roughly fifty cents a piece for the added hook material, and the system is meant to be removed before washing, since running the hooks through a laundry cycle wears them and loads the loop side with lint. Choose it when the same panel needs to show different patches, not when you want one patch to stay forever.
Peel-and-stick: strictly temporary
Pressure-sensitive adhesive backing peels off a liner and presses on by hand with no heat or tools. It is genuinely useful for events, conventions, and short-lived promotions where a patch needs to live on a lanyard or a sign for a weekend. It is not a laundry solution: its wash durability is poorer than iron-on, and it is best treated as single-use. For a few cents a piece over the base price it buys instant application and nothing more, which is exactly right for a one-day use and wrong for apparel.
How to choose without guessing
Work backward from the garment and the wash, not from the patch. If the item is cotton, denim, canvas, or a stable blend and will see normal home laundering, iron-on gives you the easiest application and a perfectly adequate lifespan. If the fabric is nylon, waterproof, leather, or a technical performance material, or if the piece will be laundered industrially or worn hard for years, specify sew-on from the start and budget the stitching. If one panel needs to display interchangeable patches, go Velcro and have the loop side sewn in. If the patch only has to survive a weekend, peel-and-stick is the cheap, correct answer.
The professional move when a patch matters is to combine methods: iron the patch down to position and hold it, then stitch the border for permanence. You get the placement precision of heat and the longevity of thread, and you sidestep the single biggest disappointment in patch ordering, which is watching a good-looking patch that was applied the easy way lift at one corner and walk itself off in the wash. Decide the backing when you decide the artwork, because on a patch, how it holds on matters as much as how it looks.