Most patch orders that disappoint have nothing to do with stitch quality or color. They go wrong at the very first decision: the size. A logo that looks crisp on a screen turns into a muddy 2-inch blob on a cap, or a back patch arrives so large it swallows the jacket it was meant to sit on. Getting the dimensions right before you approve artwork is the single most useful thing you can do for the finished result, and it takes only a few minutes of measuring.
This walkthrough treats sizing the way a production team does: start from where the patch will live, work out how much room that spot actually gives you, then check that your artwork survives at that size. Do it in that order and the quote, the proof, and the delivered patch all line up.
Measure the garment first, not the patch
The usable area is always smaller than it looks. A jacket back appears to offer a huge canvas, but seams, a center zipper, and the taper toward the shoulders eat into it fast. A cap front is a curved panel bounded by stitching and the bill. Before you settle on a number, lay a ruler or a piece of paper cut to size against the actual spot and see what fits without crowding a seam or wrapping around a curve. Patches are almost always specified as width by height in inches, and for a round patch the single number is the diameter.
One quiet trap is the difference between how a patch reads flat on a table and how it reads on a body. A 3.5-inch patch is about the widest most cap fronts will take before the edges start to lift or curl around the curve of the panel. On a chest, the same patch sits comfortably. Same dimensions, very different outcomes, which is why placement drives the number rather than the other way around.
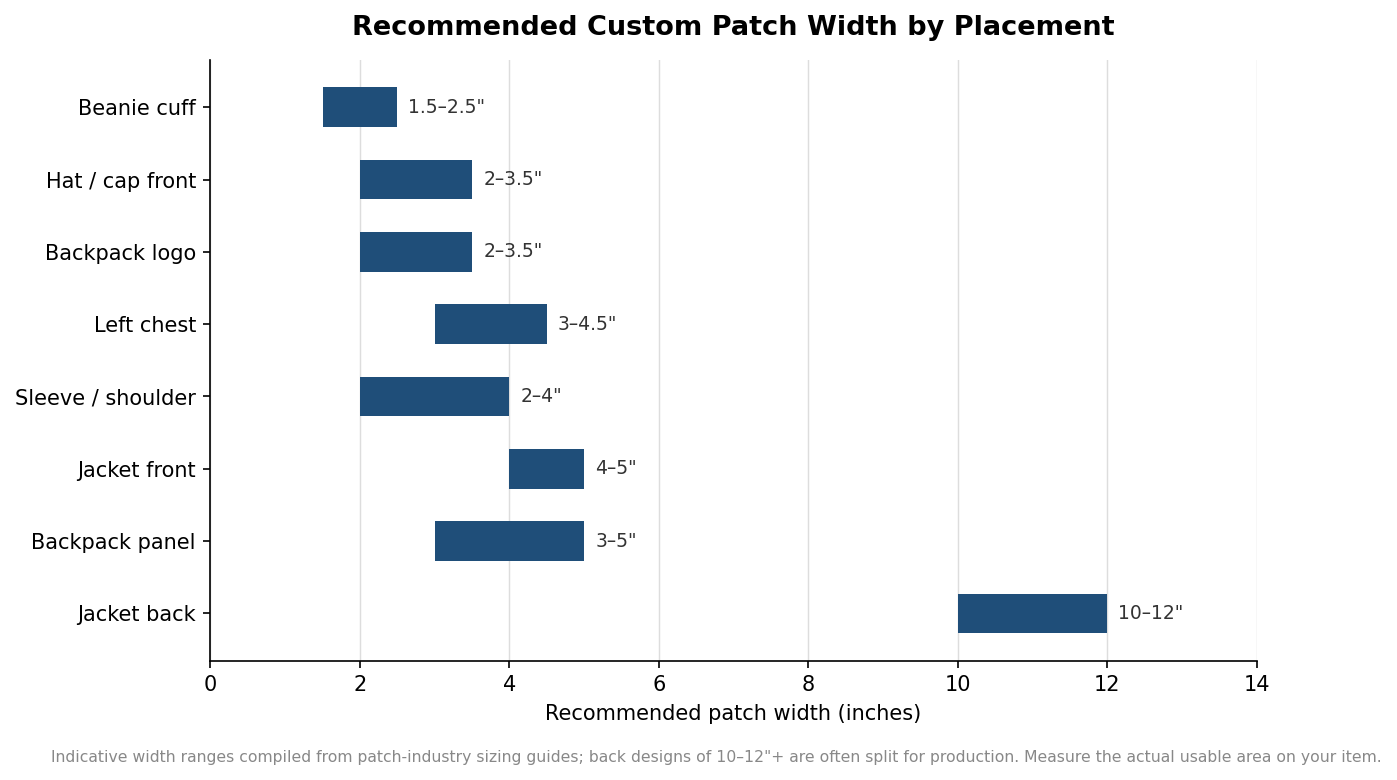
Sensible starting sizes for the common placements
The ranges above are a reliable starting point, and they hold up across the patch industry’s own sizing guides. For a cap or trucker hat front, plan on roughly 2 to 3.5 inches wide; a popular, easy-to-read choice is about 3 by 2 inches. A left chest logo on a shirt or jacket generally lands between 3 and 4.5 inches wide, with 3 by 2 inches a dependable default. Sleeve and shoulder patches usually run 2 to 4 inches, and a 2-inch square reads well on a uniform sleeve.
Larger placements scale up predictably. A jacket front panel takes 4 to 5 inches, a backpack panel 3 to 5 inches, and a full jacket back 10 to 12 inches or more for the bold, across-the-shoulders look. Be aware that back patches at the top of that range are often produced in sections or need special handling, because a single continuous embroidered panel that large behaves differently on the machine. A beanie cuff is the tightest common spot, comfortable only around 1.5 to 2.5 inches wide before the design distorts when the cuff folds.
Match the size to your artwork, not just the spot
Once you know the room you have, look hard at the design itself. The rule that matters is that fine detail needs physical space to survive. Thin lettering, a registered-trademark mark, a thin outline, or a gradient all need room, and thread in particular can only get so fine. As a working threshold, embroidered designs with small text or delicate lines tend to hold together at about 3 inches and larger; shrink the same art to 2 inches and the smallest words start to fill in and blur.
This is where material choice interacts with size. If your design has to stay small but carries fine detail, the answer is often to change the construction rather than force the dimensions. Woven patches use much finer threads than standard embroidery and hold sharper detail at smaller sizes. PVC and dye-sublimated (printed) patches go smaller still, because they are not limited by stitch width at all. The chart below shows roughly where each method starts to struggle with small text, and it is the reason a 1.75-inch printed logo can look clean while a 1.75-inch embroidered version of the same logo looks soft.
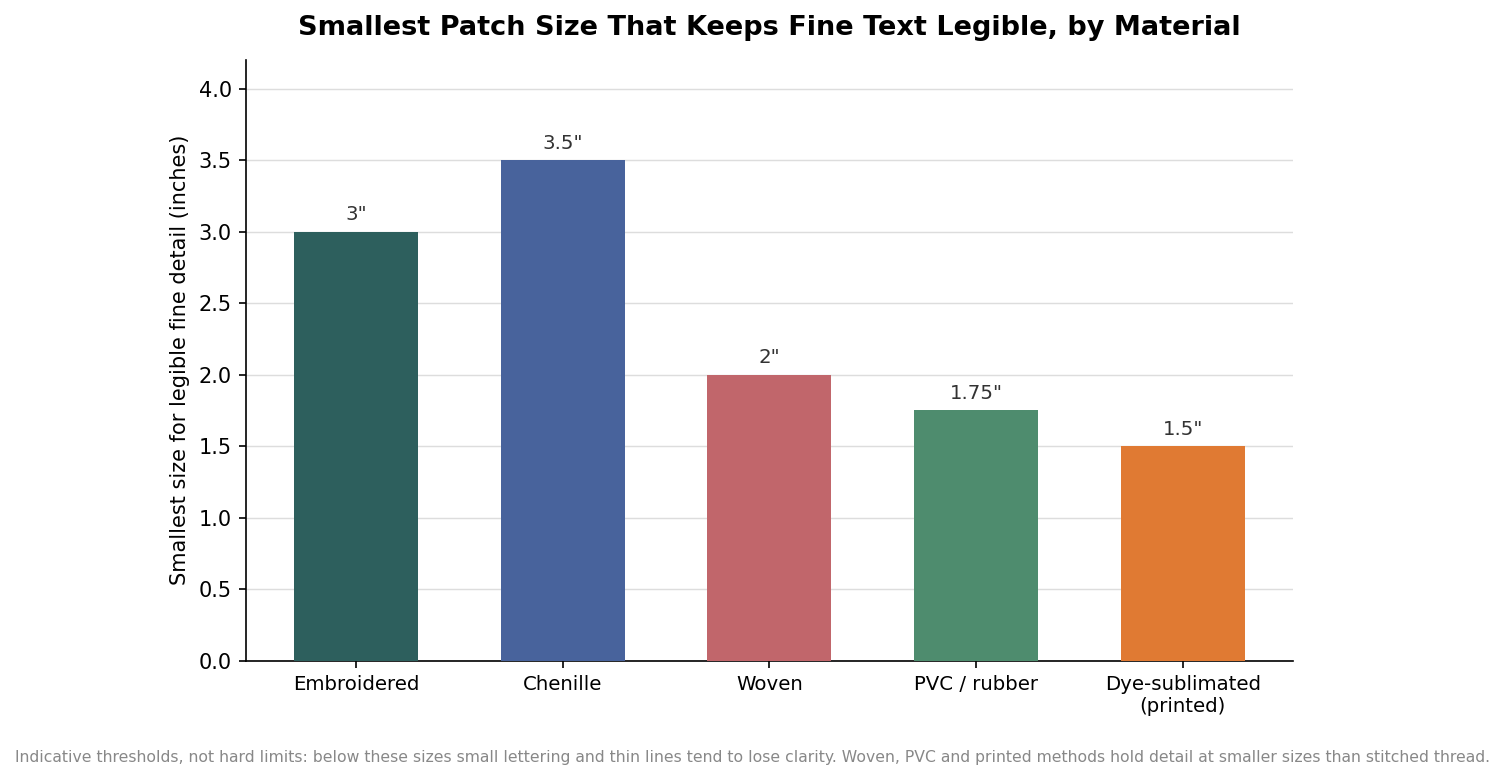
Treat those numbers as guidance rather than hard cutoffs. A simple, chunky logo with no small text can go smaller than the thresholds suggest, while a busy crest with a motto and a date may want to be larger than the placement’s default. When in doubt, ask for a proof at the exact size you intend to order, not a scaled-up preview, so you are judging the design as it will actually be stitched.
How size feeds into your quote
Patch pricing is driven mainly by size and quantity, and the size figure used for pricing is typically the average of the width and the height rather than the larger dimension. A patch that measures 4 inches wide by 2 inches tall is usually priced as a 3-inch patch, because (4 + 2) divided by 2 is 3. That averaging is worth knowing when you are on the edge of a price tier, since trimming half an inch off the height of a wide patch can nudge you into a lower bracket without changing how the design reads. Larger patches also use more thread and more machine time, so cost climbs with size in a fairly steady way, and per-unit cost falls as the order quantity rises.
Minimum order quantities are the other lever. Many custom patch runs start somewhere around 50 to 100 pieces, and the price per patch at the minimum can be noticeably higher than at a few hundred. If you are choosing between two sizes and the budget is tight, it is often cheaper per piece to keep the size modest and let quantity do the work than to order a small number of oversized patches. Where a specific price matters to your decision, confirm it against a live quote rather than a rule of thumb, since materials, backing, and border style all move the number.
A quick spec you can hand to any supplier
By the time you place the order, you want five things nailed down so nothing is left to interpretation: the shape, the exact width by height in inches, the placement it is designed for, the construction method, and the backing. A complete request reads something like “3.5 by 2.5 inch rectangular woven patch, left-chest placement, iron-on backing.” That one line tells a production team everything it needs to give you an accurate quote and a proof that matches what lands on your doorstep. Spend the few minutes measuring and checking your artwork at size, and the patch you approve on screen is the patch you get.