Iron-on patches look foolproof, and then someone presses one onto a nylon jacket, watches the fabric pucker, and learns the hard way that heat-activated adhesive has rules. Applied correctly, an iron-on patch bonds in well under a minute and holds through dozens of washes. Applied carelessly, it scorches the garment or peels at the first laundry cycle. This is the full method, including the fabric check most guides skip and the temperatures that actually matter.
Check the fabric before you reach for the iron
The adhesive on the back of an iron-on patch is a hot-melt glue that needs roughly 270 to 320 degrees Fahrenheit to activate and bond. The catch is that not every fabric can survive that heat, so the first question is not “how do I press this?” but “can this fabric take the temperature the glue needs?”
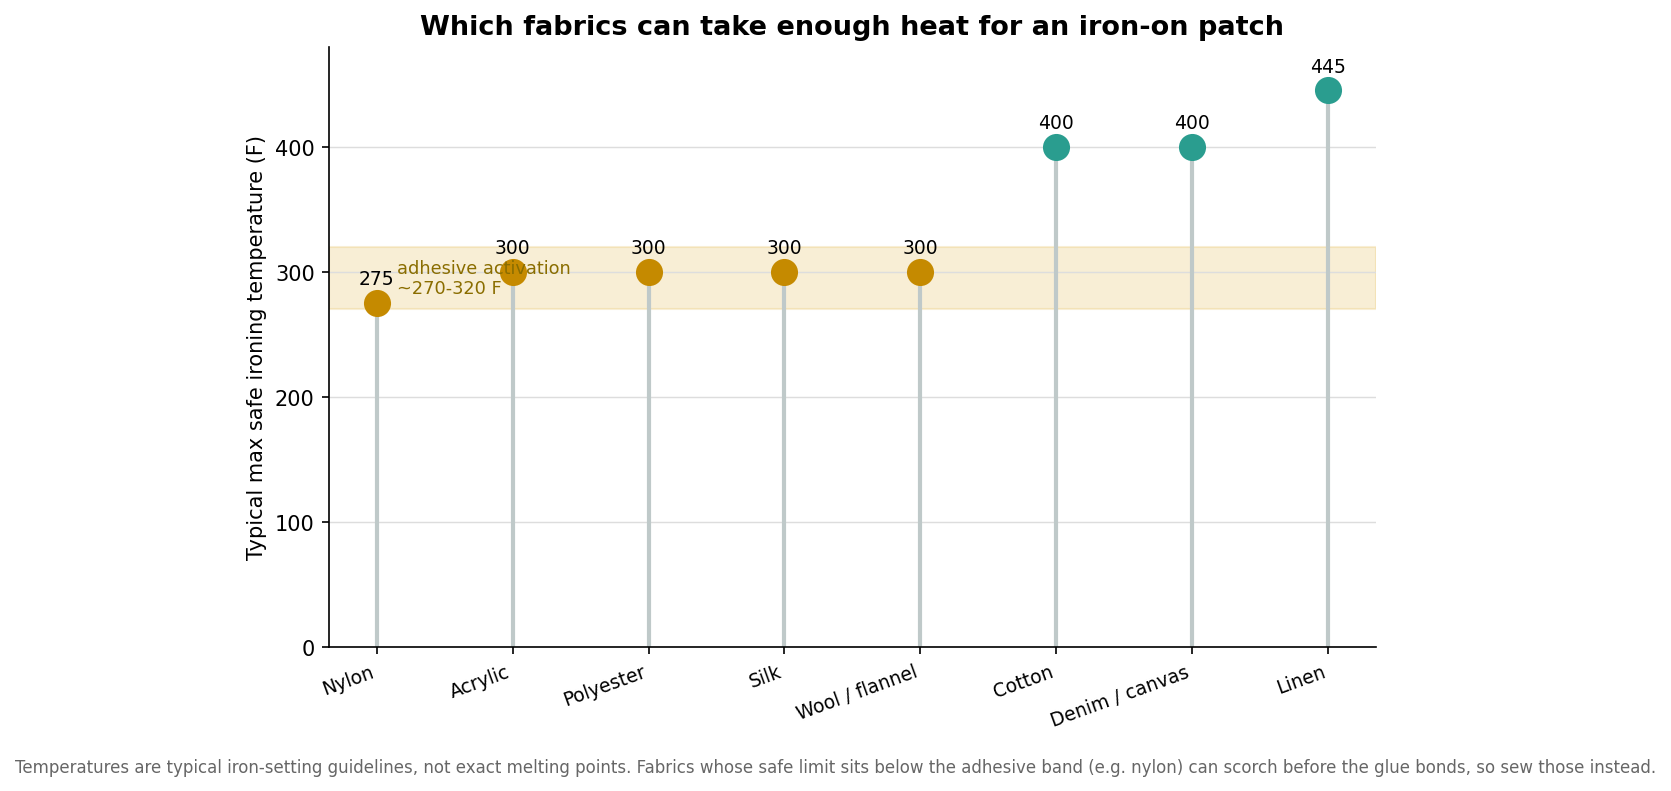
Cotton, denim, canvas, and linen sit comfortably above the activation range, which is why they are the classic iron-on fabrics. Wool, polyester, and silk are marginal: they can just about reach the bond temperature, but only on a lower setting and with a pressing cloth to shield them. Nylon and most technical or waterproof-coated fabrics sit below the range, meaning they will scorch or melt before the glue sets. If your item is nylon, leather, suede, spandex, acetate, rayon, or a coated performance fabric, stop here and plan to sew the patch instead.
Set up: iron, surface, and a pressing cloth
Work on a hard, flat, heat-tolerant surface such as a wooden board or a folded towel on a countertop, not a soft ironing board, because even pressure is what seals the patch edges. Turn steam off completely and empty the water if your iron tends to spit; moisture interferes with the adhesive. Set the temperature to match the fabric, not the patch: the cotton setting for cotton and denim, a medium setting for wool and flannel, and a low setting around 240 to 280 degrees for polyester.
Always use a pressing cloth between the iron and the patch. A thin cotton cloth, a clean white pillowcase, or a sheet of parchment paper all work; avoid wax paper and anything plastic-coated, which can melt onto your project. The cloth protects the patch’s threads and the surrounding fabric from direct contact with the iron’s soleplate. It is also worth confirming the patch is actually an iron-on before you start: a heat-seal patch has a slightly shiny, cloudy adhesive film on the back, whereas a sew-only patch has plain fabric backing and will never bond with heat alone.
The press, step by step
Position the patch exactly where you want it, because once the glue sets you will not get a clean second chance. Lay the pressing cloth over it. Press the iron straight down with firm, steady pressure and hold it in place rather than moving it around; the goal is even heat, not ironing motion. Hold the press for the time the fabric allows, then let everything cool before you test it.
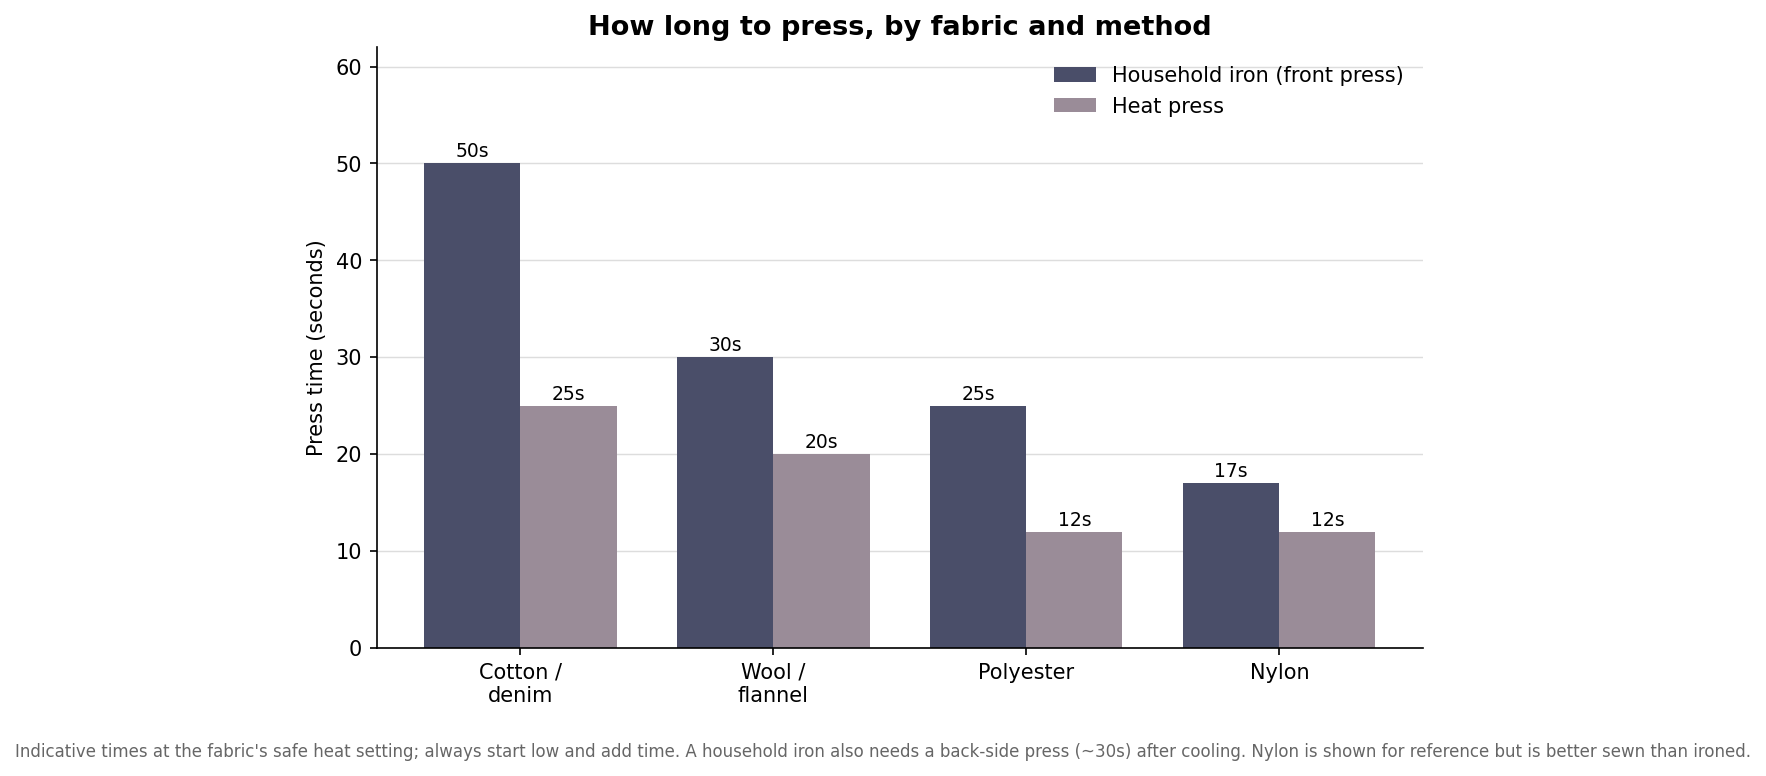
As the chart shows, sturdier fabrics both tolerate and need more time. On denim or canvas with a household iron, expect to hold firm pressure for around 45 to 60 seconds; on wool or polyester, use a shorter press at lower heat. A dedicated heat press bonds faster and more reliably because it delivers even temperature and pressure, which is why it typically needs only 15 to 30 seconds. After the front press, let the item cool for a minute or two, turn it inside out, and press again from the back for about 30 seconds to lock the adhesive from both sides. Then leave it alone for at least five minutes to cool fully before touching or moving it.
Make it last: washing and re-pressing
Adhesion is strongest once the bond has had time to cure, so wait about 24 hours before the first wash. When you do wash the garment, turn it inside out and use a cold, gentle cycle; hot water and aggressive agitation are what loosen iron-on patches fastest. Air drying is gentler than a hot dryer, which can soften the adhesive over time.
Even with good care, a purely iron-on bond is not permanent. The adhesive gradually weakens with repeated washing, and a practical habit is to re-press the patch every 10 to 15 washes to refresh the bond before an edge starts lifting. If you catch a corner peeling, re-press it promptly with a cloth rather than picking at it, which only spreads the gap.
When to sew instead
Iron-on is the right call for decorative patches on cotton and denim that see normal wear. For anything that must survive heavy laundering, hard use, or a lifetime of wear, sewing is more durable, and in several cases it is the only safe option. Sew, do not iron, on nylon and other heat-sensitive fabrics, on leather and suede that scorch, and on delicate materials like silk or sequined patches. Many people use both: iron the patch on first to hold it perfectly in position, then stitch around the edge for permanence. That combination gives you the clean placement of an iron-on with the durability of a sewn patch, and it is the most reliable way to keep a patch exactly where you put it for years. Whichever route you choose, the fabric check comes first; get that right and the rest of the process is quick and forgiving.
Leave a Reply