Category: Uncategorized

  • Custom Patch Size Guide: How to Choose Dimensions by Placement

    Custom Patch Size Guide: How to Choose Dimensions by Placement

    Most patch orders that disappoint have nothing to do with stitch quality or color. They go wrong at the very first decision: the size. A logo that looks crisp on a screen turns into a muddy 2-inch blob on a cap, or a back patch arrives so large it swallows the jacket it was meant to sit on. Getting the dimensions right before you approve artwork is the single most useful thing you can do for the finished result, and it takes only a few minutes of measuring.

    This walkthrough treats sizing the way a production team does: start from where the patch will live, work out how much room that spot actually gives you, then check that your artwork survives at that size. Do it in that order and the quote, the proof, and the delivered patch all line up.

    Measure the garment first, not the patch

    The usable area is always smaller than it looks. A jacket back appears to offer a huge canvas, but seams, a center zipper, and the taper toward the shoulders eat into it fast. A cap front is a curved panel bounded by stitching and the bill. Before you settle on a number, lay a ruler or a piece of paper cut to size against the actual spot and see what fits without crowding a seam or wrapping around a curve. Patches are almost always specified as width by height in inches, and for a round patch the single number is the diameter.

    One quiet trap is the difference between how a patch reads flat on a table and how it reads on a body. A 3.5-inch patch is about the widest most cap fronts will take before the edges start to lift or curl around the curve of the panel. On a chest, the same patch sits comfortably. Same dimensions, very different outcomes, which is why placement drives the number rather than the other way around.
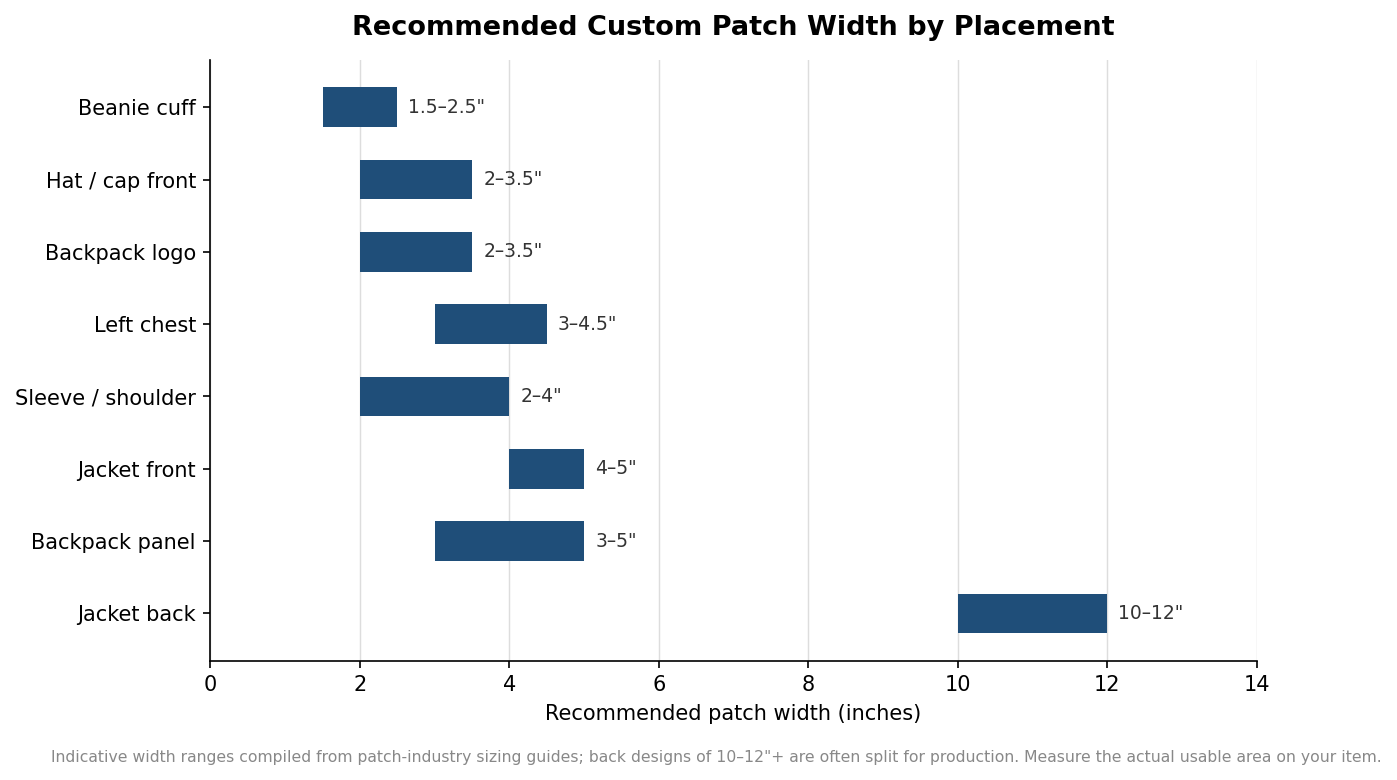
    Horizontal range chart of recommended custom patch width in inches for beanie, hat, chest, sleeve, jacket and backpack placements
    Recommended patch width ranges by where the patch will be worn.

    Sensible starting sizes for the common placements

    The ranges above are a reliable starting point, and they hold up across the patch industry’s own sizing guides. For a cap or trucker hat front, plan on roughly 2 to 3.5 inches wide; a popular, easy-to-read choice is about 3 by 2 inches. A left chest logo on a shirt or jacket generally lands between 3 and 4.5 inches wide, with 3 by 2 inches a dependable default. Sleeve and shoulder patches usually run 2 to 4 inches, and a 2-inch square reads well on a uniform sleeve.

    Larger placements scale up predictably. A jacket front panel takes 4 to 5 inches, a backpack panel 3 to 5 inches, and a full jacket back 10 to 12 inches or more for the bold, across-the-shoulders look. Be aware that back patches at the top of that range are often produced in sections or need special handling, because a single continuous embroidered panel that large behaves differently on the machine. A beanie cuff is the tightest common spot, comfortable only around 1.5 to 2.5 inches wide before the design distorts when the cuff folds.

    Match the size to your artwork, not just the spot

    Once you know the room you have, look hard at the design itself. The rule that matters is that fine detail needs physical space to survive. Thin lettering, a registered-trademark mark, a thin outline, or a gradient all need room, and thread in particular can only get so fine. As a working threshold, embroidered designs with small text or delicate lines tend to hold together at about 3 inches and larger; shrink the same art to 2 inches and the smallest words start to fill in and blur.

    This is where material choice interacts with size. If your design has to stay small but carries fine detail, the answer is often to change the construction rather than force the dimensions. Woven patches use much finer threads than standard embroidery and hold sharper detail at smaller sizes. PVC and dye-sublimated (printed) patches go smaller still, because they are not limited by stitch width at all. The chart below shows roughly where each method starts to struggle with small text, and it is the reason a 1.75-inch printed logo can look clean while a 1.75-inch embroidered version of the same logo looks soft.
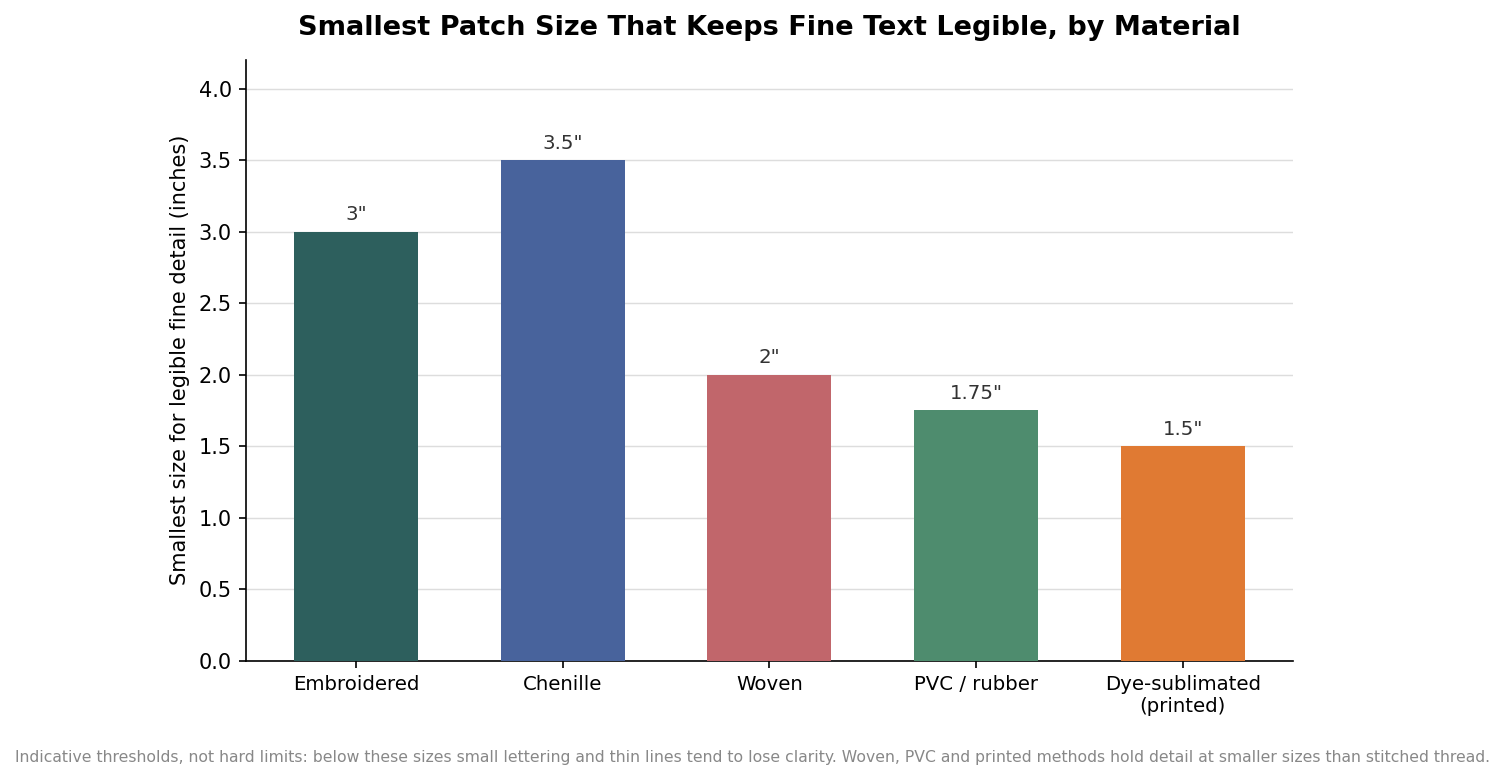
    Bar chart of the smallest patch size that keeps fine text legible for embroidered, chenille, woven, PVC and printed patches
    Below these indicative sizes, small text starts to lose clarity, and the threshold depends on material.

    Treat those numbers as guidance rather than hard cutoffs. A simple, chunky logo with no small text can go smaller than the thresholds suggest, while a busy crest with a motto and a date may want to be larger than the placement’s default. When in doubt, ask for a proof at the exact size you intend to order, not a scaled-up preview, so you are judging the design as it will actually be stitched.

    How size feeds into your quote

    Patch pricing is driven mainly by size and quantity, and the size figure used for pricing is typically the average of the width and the height rather than the larger dimension. A patch that measures 4 inches wide by 2 inches tall is usually priced as a 3-inch patch, because (4 + 2) divided by 2 is 3. That averaging is worth knowing when you are on the edge of a price tier, since trimming half an inch off the height of a wide patch can nudge you into a lower bracket without changing how the design reads. Larger patches also use more thread and more machine time, so cost climbs with size in a fairly steady way, and per-unit cost falls as the order quantity rises.

    Minimum order quantities are the other lever. Many custom patch runs start somewhere around 50 to 100 pieces, and the price per patch at the minimum can be noticeably higher than at a few hundred. If you are choosing between two sizes and the budget is tight, it is often cheaper per piece to keep the size modest and let quantity do the work than to order a small number of oversized patches. Where a specific price matters to your decision, confirm it against a live quote rather than a rule of thumb, since materials, backing, and border style all move the number.

    A quick spec you can hand to any supplier

    By the time you place the order, you want five things nailed down so nothing is left to interpretation: the shape, the exact width by height in inches, the placement it is designed for, the construction method, and the backing. A complete request reads something like “3.5 by 2.5 inch rectangular woven patch, left-chest placement, iron-on backing.” That one line tells a production team everything it needs to give you an accurate quote and a proof that matches what lands on your doorstep. Spend the few minutes measuring and checking your artwork at size, and the patch you approve on screen is the patch you get.
  • Iron-On vs Sew-On vs Velcro: Choosing the Right Patch Backing

    Iron-On vs Sew-On vs Velcro: Choosing the Right Patch Backing

    Buyers spend most of their attention on how a patch looks, embroidered or woven, merrowed or laser-cut border, thread colors matched to a brand. That is only half the decision. The backing, the layer on the reverse that decides how the patch attaches and how long it survives, determines whether the finished piece is still on the garment after a season of wear or peeling off in the dryer. The face is a design choice; the backing is an engineering one, and getting it wrong is the most common and most avoidable patch-ordering mistake.

    Iron-on: convenient, and fussier than it looks

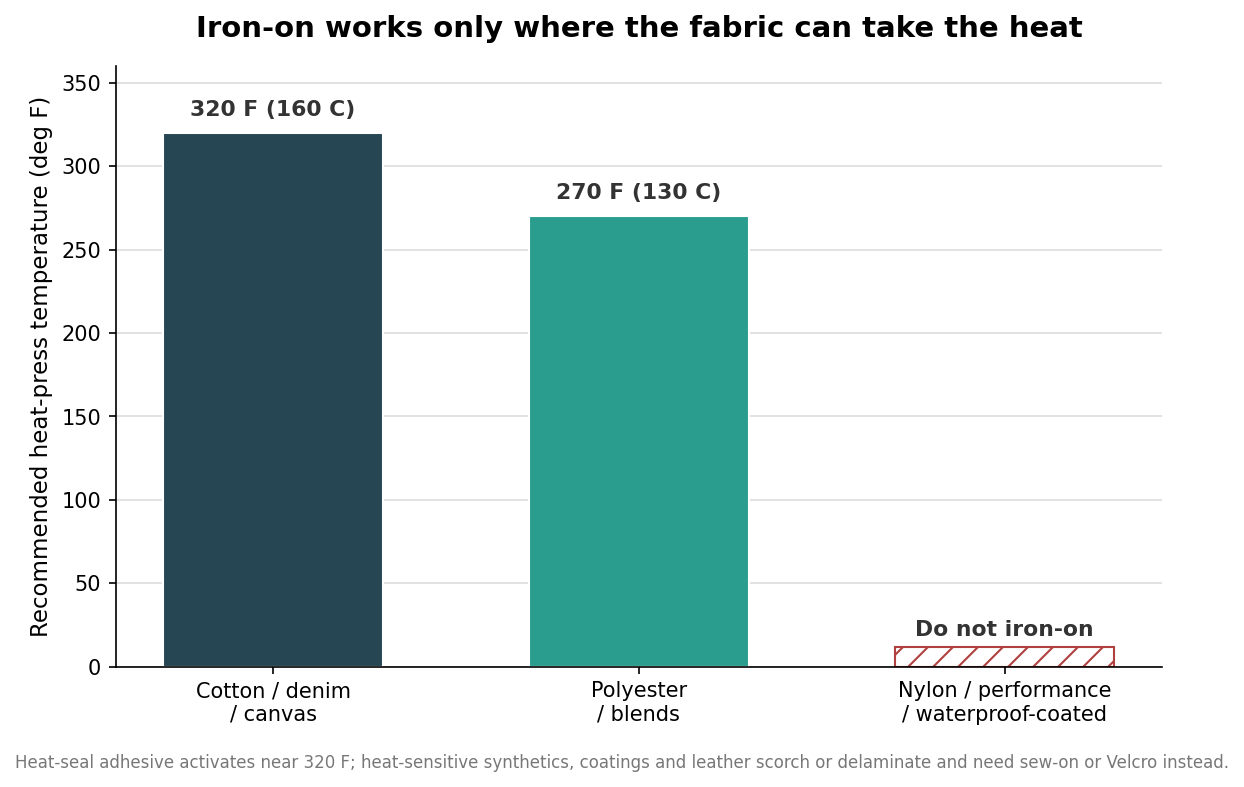
    An iron-on patch carries a film of heat-activated adhesive on the back. Apply heat and pressure and the film melts into the fabric; let it cool and it grips. The adhesive activates in the region of 320°F (160°C), with cotton, denim, and canvas taking the top of that range and polyester and blends needing a gentler 270°F (130°C) to avoid scorching or shine. A typical application is fifteen to thirty seconds of firm, even pressure, followed by a full cure before the garment is stressed; most makers advise waiting about 24 hours before the first wash. The chart below shows why the fabric, not the patch, sets the temperature.

    Bar chart of recommended iron-on heat-press temperature by fabric, flagging nylon, performance and waterproof fabrics as do-not-iron
    The fabric sets the press temperature-and some fabrics cannot be ironed at all.

    Where iron-on quietly fails is the fabric it cannot heat. Heat-sensitive synthetics, many nylons, technical performance fabrics, waterproof-coated shells, and leather will scorch, pucker, or delaminate long before the adhesive is happy. Those materials are not iron-on candidates at all, and pressing them anyway is how a promotional order comes back ruined. Iron-on is also a consumer-durability solution rather than an industrial one: expect roughly twenty to thirty wash cycles from a well-applied patch, longer with cold, gentle, inside-out washing, and it can usually be re-pressed three to five times before the adhesive tires. For retail merch, hats, tote bags, and DIY application it is ideal. For anything laundered hard or worn on the wrong fabric, it is the wrong pick.

    Sew-on: the permanent answer

    Stitching a patch through its border is the oldest attachment method and still the most durable by a wide margin. A sew-on patch works on essentially any fabric a needle can pierce, and its hold is effectively permanent.

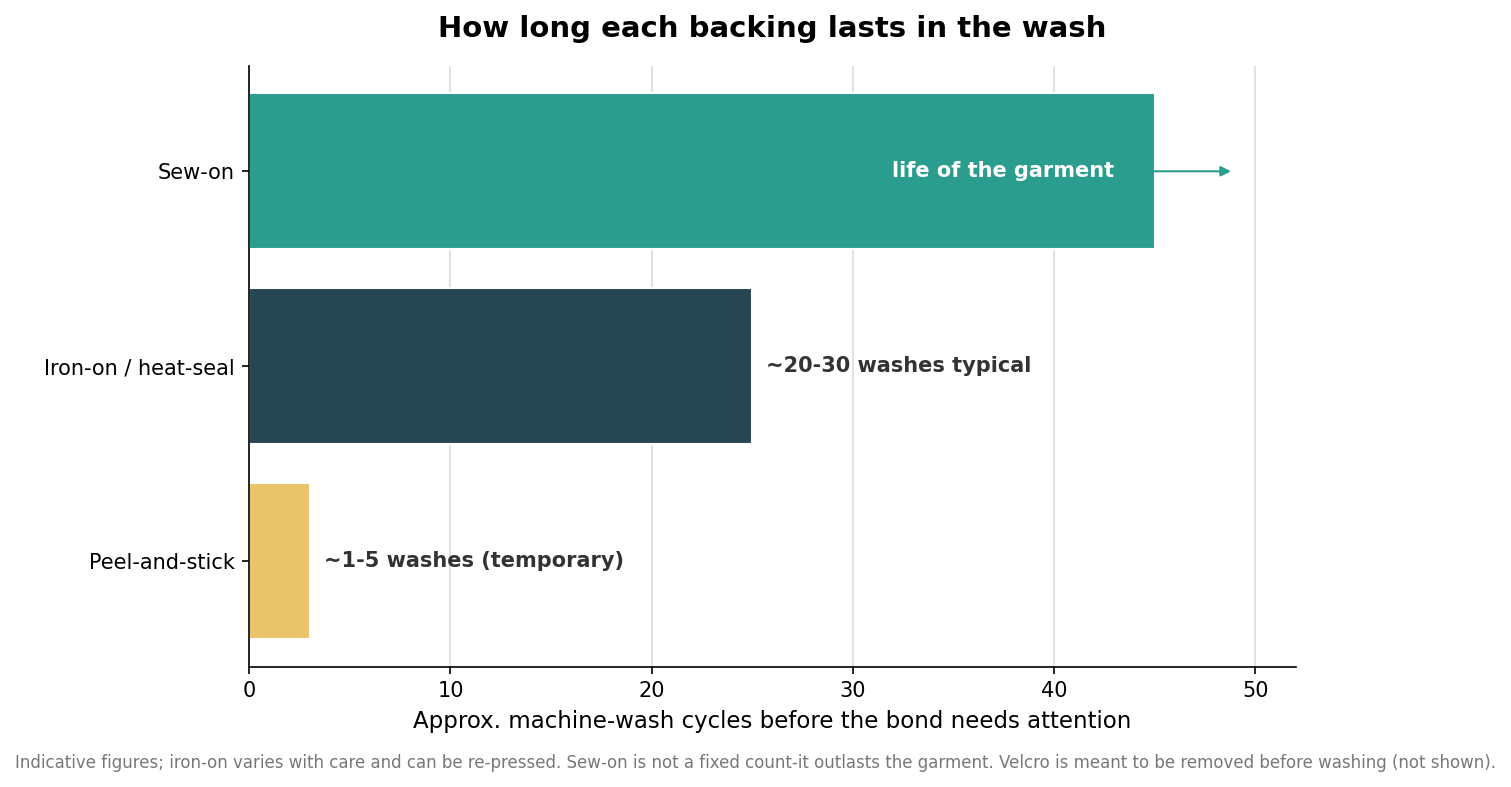
    Horizontal bar chart comparing approximate machine-wash durability of peel-and-stick, iron-on, and sew-on patch backings
    Sew-on outlasts the garment; iron-on holds for dozens of washes; peel-and-stick is temporary.

    The durability gap is not subtle. Where iron-on is measured in dozens of wash cycles, a sewn patch generally outlasts the garment it is attached to, which is why military uniforms, varsity jackets, workwear, and biker vests are sewn rather than pressed. The cost is labor and time: hand or machine stitching runs several minutes per patch and usually means a tailor or an in-house sewing step, so it trades convenience for a bond you never have to think about again. When a patch absolutely must stay put through heavy laundering, sew-on is not one option among several; it is the option.

    Velcro: for patches that need to come off

    Hook-and-loop backing exists for a different requirement entirely: swappability. A Velcro-backed patch attaches to a pre-sewn loop panel in under a second and can be removed and reattached a thousand times or more, which is why tactical gear, name tapes, and morale patches use it. The trade-offs are that the garment needs the loop side installed first, the patch carries a modest premium of roughly fifty cents a piece for the added hook material, and the system is meant to be removed before washing, since running the hooks through a laundry cycle wears them and loads the loop side with lint. Choose it when the same panel needs to show different patches, not when you want one patch to stay forever.

    Peel-and-stick: strictly temporary

    Pressure-sensitive adhesive backing peels off a liner and presses on by hand with no heat or tools. It is genuinely useful for events, conventions, and short-lived promotions where a patch needs to live on a lanyard or a sign for a weekend. It is not a laundry solution: its wash durability is poorer than iron-on, and it is best treated as single-use. For a few cents a piece over the base price it buys instant application and nothing more, which is exactly right for a one-day use and wrong for apparel.

    How to choose without guessing

    Work backward from the garment and the wash, not from the patch. If the item is cotton, denim, canvas, or a stable blend and will see normal home laundering, iron-on gives you the easiest application and a perfectly adequate lifespan. If the fabric is nylon, waterproof, leather, or a technical performance material, or if the piece will be laundered industrially or worn hard for years, specify sew-on from the start and budget the stitching. If one panel needs to display interchangeable patches, go Velcro and have the loop side sewn in. If the patch only has to survive a weekend, peel-and-stick is the cheap, correct answer.

    The professional move when a patch matters is to combine methods: iron the patch down to position and hold it, then stitch the border for permanence. You get the placement precision of heat and the longevity of thread, and you sidestep the single biggest disappointment in patch ordering, which is watching a good-looking patch that was applied the easy way lift at one corner and walk itself off in the wash. Decide the backing when you decide the artwork, because on a patch, how it holds on matters as much as how it looks.

  • Embroidered vs Woven Patches: Which Holds Your Detail?

    Call or Text us: (929) 605-4397
    Specs

    Embroidered vs Woven Patches: Which Holds Your Detail?

    It comes down to thread thickness

    These two look similar in a catalogue and behave completely differently in production. The deciding factor is thread thickness, and it determines whether your small text survives.

    Embroidered: thicker thread, raised finish

    Embroidery stitches relatively thick thread through a twill base, so the design sits proud with genuine texture. That texture is the whole appeal, and it is extremely hard-wearing. The limit is resolution: below a certain size, detail simply falls between the stitches.

    Woven: finer thread, flat finish

    Woven patches use a much finer thread woven into the patch itself, lying flat rather than raised. The finer thread is what lets them carry small lettering, thin outlines and intricate crests at sizes where embroidery would turn to mush.

    How to decide in ten seconds

    Look at the smallest element in your artwork. If it is a thin line or text under about a quarter inch tall, go woven. If everything is bold and you want the texture, go embroidered. If you are unsure, send it to us and we will tell you which it suits before you commit.

    Durability is not the difference

    Both are stitched textile patches on the same heat-seal backing and both survive washing. Choose on appearance and detail, not on toughness. Minimum order is 12 patches and production runs 2 weeks.

    Create your custom iron on patches now.

    Send your logo, quantity and date — you’ll get a free mockup and quote within one business day.

    Get a Quote
    GET A QUOTE
  • How to Iron On a Patch So It Actually Stays

    Call or Text us: (929) 605-4397
    How-to

    How to Iron On a Patch So It Actually Stays

    Nearly every failure is application, not manufacture

    Most patches that fall off were applied wrong, not made wrong. Four things account for nearly every failure, and all of them take under a minute to get right.

    Heat, and no steam

    The adhesive needs real heat to melt into the fabric. Use a hot dry iron with the steam turned off — steam cools the plate and puts moisture between the patch and the garment, which is the single most common cause of a patch lifting at the edge.

    Pressure and time

    Press firmly and hold for about thirty seconds. Do not slide the iron around; the point is sustained pressure in one place. Use a thin cloth between the iron and the patch so you never touch the stitching directly.

    Check the fabric first

    Heat-seal backing needs a fabric that can take the iron. Cotton, denim and canvas are ideal. Nylon, waterproof shells and anything with a coating cannot take that heat, and those garments need the patch stitched on instead.

    Stitch the ones that matter

    For a large back patch, heavy workwear or anything going through industrial laundering, iron it on to position it and then stitch around the edge. The adhesive holds it in place while you sew, which is genuinely the easiest way to do it. Minimum order is 12 patches, production runs 2 weeks, and your free mockup arrives within 24 hours.

    Create your custom iron on patches now.

    Send your logo, quantity and date — you’ll get a free mockup and quote within one business day.

    Get a Quote
    GET A QUOTE
  • Custom Iron On Patches: A Buyer’s Guide

    Call or Text us: (929) 605-4397
    Buyer’s guide

    Custom Iron On Patches: A Buyer’s Guide

    Let the artwork choose the patch type

    Almost every disappointing patch comes from one mistake: choosing the type before looking honestly at the artwork. Get that order right and the rest of the decisions are easy.

    Embroidery is thread through twill. It looks and feels like a patch should, and it is the most durable option, but it cannot hold fine lines or small type. If your logo has thin strokes or small lettering, embroidery will lose them.

    Woven for detail, chenille for letters

    Woven patches use a much finer thread and lie flat, which lets them hold detail embroidery cannot. Chenille is the thick fuzzy varsity material, and it is for letters and numbers only — do not expect it to carry a crest.

    PVC and printed solve the edge cases

    PVC is moulded rubber: waterproof, sharp-edged and ideal for outdoor gear. Printed is dye onto fabric, and it is the only type that reproduces a photograph or a gradient. Between them they cover almost everything thread cannot.

    Consider the shape, not just the design

    A strong logo outline is wasted inside a rectangle. A die-cut patch is cut to the artwork’s own edge and sealed so it cannot fray, which makes it read as part of the garment rather than a badge stuck on it.

    Iron on, but stitch what matters

    Our heat-seal backing survives repeated washing including industrial laundering. For a large back patch or anything on heavy workwear, iron it on and stitch it down as well. Minimum order is 12 patches, production runs 2 weeks, and the mockup is free within 24 hours.

    Create your custom iron on patches now.

    Send your logo, quantity and date — you’ll get a free mockup and quote within one business day.

    Get a Quote
    GET A QUOTE
  • How to Iron On Patches: A Step-by-Step Guide That Actually Holds

    How to Iron On Patches: A Step-by-Step Guide That Actually Holds

    Iron-on patches look foolproof, and then someone presses one onto a nylon jacket, watches the fabric pucker, and learns the hard way that heat-activated adhesive has rules. Applied correctly, an iron-on patch bonds in well under a minute and holds through dozens of washes. Applied carelessly, it scorches the garment or peels at the first laundry cycle. This is the full method, including the fabric check most guides skip and the temperatures that actually matter.

    Check the fabric before you reach for the iron

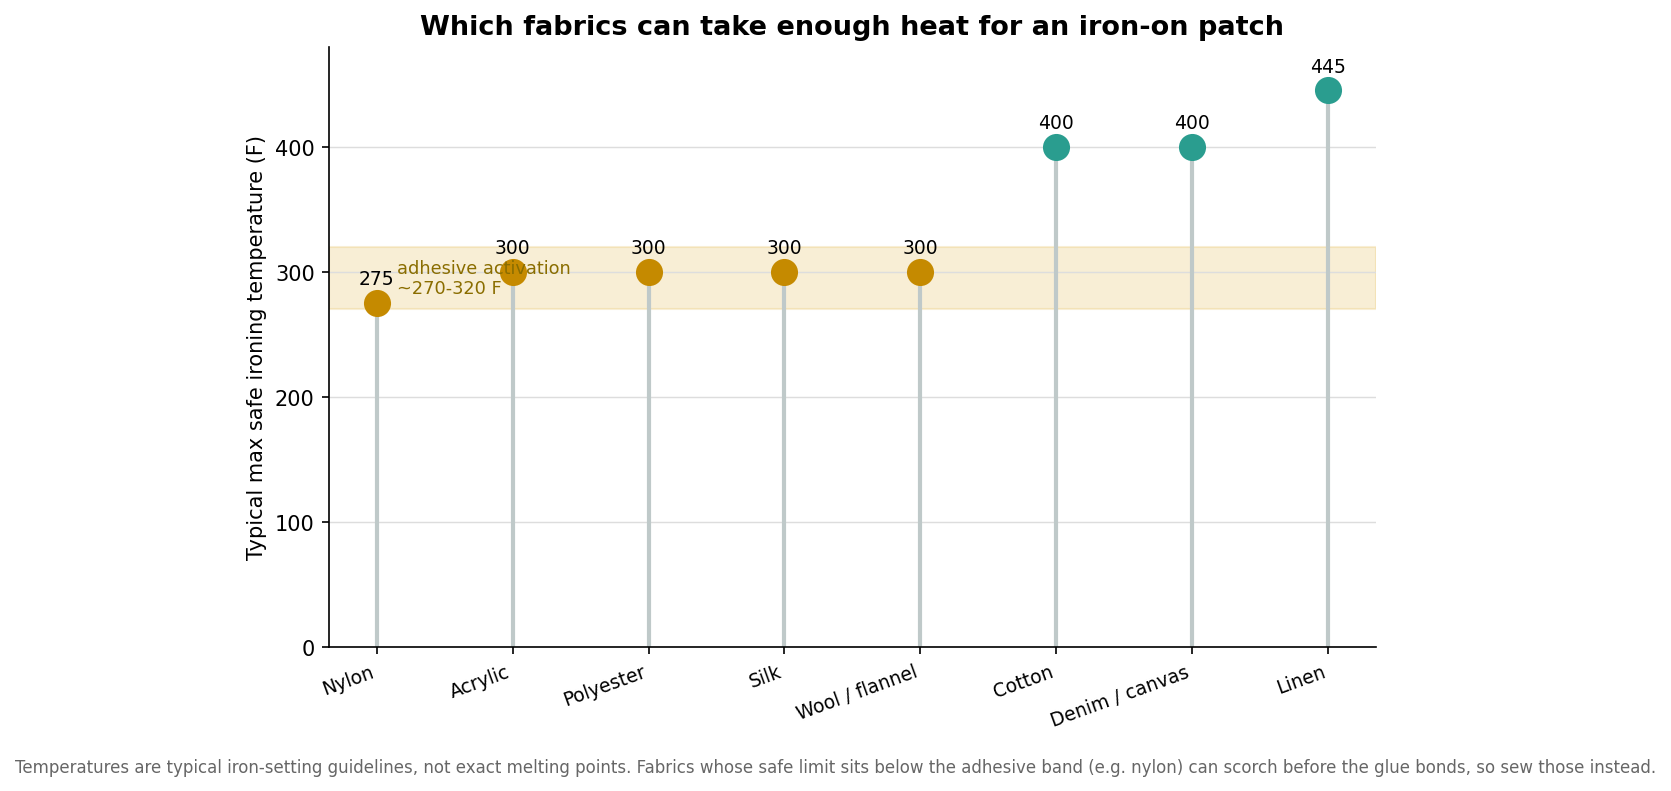
    The adhesive on the back of an iron-on patch is a hot-melt glue that needs roughly 270 to 320 degrees Fahrenheit to activate and bond. The catch is that not every fabric can survive that heat, so the first question is not “how do I press this?” but “can this fabric take the temperature the glue needs?”

    Lollipop chart of typical max safe ironing temperature by fabric with the 270 to 320 F adhesive activation band highlighted
    The glue needs about 270 to 320 F to bond; fabrics whose safe limit falls below that, like nylon, should be sewn.

    Cotton, denim, canvas, and linen sit comfortably above the activation range, which is why they are the classic iron-on fabrics. Wool, polyester, and silk are marginal: they can just about reach the bond temperature, but only on a lower setting and with a pressing cloth to shield them. Nylon and most technical or waterproof-coated fabrics sit below the range, meaning they will scorch or melt before the glue sets. If your item is nylon, leather, suede, spandex, acetate, rayon, or a coated performance fabric, stop here and plan to sew the patch instead.

    Set up: iron, surface, and a pressing cloth

    Work on a hard, flat, heat-tolerant surface such as a wooden board or a folded towel on a countertop, not a soft ironing board, because even pressure is what seals the patch edges. Turn steam off completely and empty the water if your iron tends to spit; moisture interferes with the adhesive. Set the temperature to match the fabric, not the patch: the cotton setting for cotton and denim, a medium setting for wool and flannel, and a low setting around 240 to 280 degrees for polyester.

    Always use a pressing cloth between the iron and the patch. A thin cotton cloth, a clean white pillowcase, or a sheet of parchment paper all work; avoid wax paper and anything plastic-coated, which can melt onto your project. The cloth protects the patch’s threads and the surrounding fabric from direct contact with the iron’s soleplate. It is also worth confirming the patch is actually an iron-on before you start: a heat-seal patch has a slightly shiny, cloudy adhesive film on the back, whereas a sew-only patch has plain fabric backing and will never bond with heat alone.

    The press, step by step

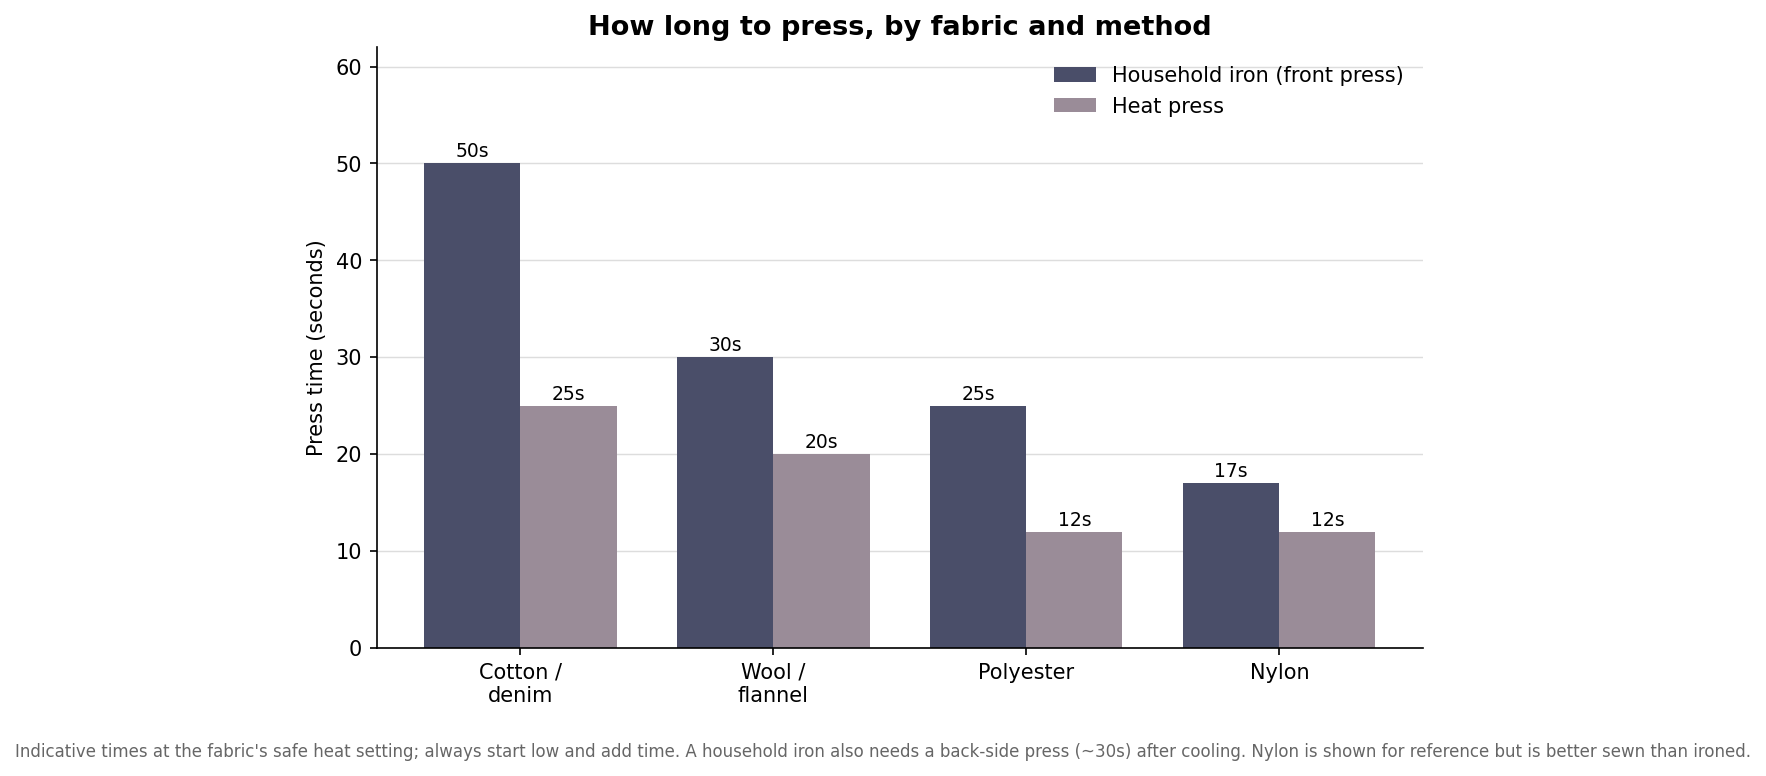
    Position the patch exactly where you want it, because once the glue sets you will not get a clean second chance. Lay the pressing cloth over it. Press the iron straight down with firm, steady pressure and hold it in place rather than moving it around; the goal is even heat, not ironing motion. Hold the press for the time the fabric allows, then let everything cool before you test it.

    Grouped bar chart of patch press time in seconds by fabric for a household iron versus a heat press
    Sturdier fabrics need a longer press; a heat press bonds faster than a household iron thanks to even heat and pressure.

    As the chart shows, sturdier fabrics both tolerate and need more time. On denim or canvas with a household iron, expect to hold firm pressure for around 45 to 60 seconds; on wool or polyester, use a shorter press at lower heat. A dedicated heat press bonds faster and more reliably because it delivers even temperature and pressure, which is why it typically needs only 15 to 30 seconds. After the front press, let the item cool for a minute or two, turn it inside out, and press again from the back for about 30 seconds to lock the adhesive from both sides. Then leave it alone for at least five minutes to cool fully before touching or moving it.

    Make it last: washing and re-pressing

    Adhesion is strongest once the bond has had time to cure, so wait about 24 hours before the first wash. When you do wash the garment, turn it inside out and use a cold, gentle cycle; hot water and aggressive agitation are what loosen iron-on patches fastest. Air drying is gentler than a hot dryer, which can soften the adhesive over time.

    Even with good care, a purely iron-on bond is not permanent. The adhesive gradually weakens with repeated washing, and a practical habit is to re-press the patch every 10 to 15 washes to refresh the bond before an edge starts lifting. If you catch a corner peeling, re-press it promptly with a cloth rather than picking at it, which only spreads the gap.

    When to sew instead

    Iron-on is the right call for decorative patches on cotton and denim that see normal wear. For anything that must survive heavy laundering, hard use, or a lifetime of wear, sewing is more durable, and in several cases it is the only safe option. Sew, do not iron, on nylon and other heat-sensitive fabrics, on leather and suede that scorch, and on delicate materials like silk or sequined patches. Many people use both: iron the patch on first to hold it perfectly in position, then stitch around the edge for permanence. That combination gives you the clean placement of an iron-on with the durability of a sewn patch, and it is the most reliable way to keep a patch exactly where you put it for years. Whichever route you choose, the fabric check comes first; get that right and the rest of the process is quick and forgiving.

  • Hello world!

    Welcome to WordPress. This is your first post. Edit or delete it, then start writing!